

You’ve probably seen, experienced, or even taught a TCCC lane in which the roleplayer, manikin or cadaver is not able to communicate, giving the medic the false idea that all airway patients will not be moving or awake. They can cut without having to consider a patient watching the scalpel coming or feeling it.
On the other hand, maybe you’ve experienced a TCCC lane where the medic takes an airway of a maxillofacial trauma or severe burn patient, while using no medication, including lidocaine. The patient is screaming and the medic is having CLS help restrain the patient. Perhaps the patient isn’t that resistant, but still awake and the medic has the charisma to “talk” a hesitant roleplayer down a little easier. How do we know what right looks like?
The purpose of this conversational article is to equip the combat medic and their instructors with an understanding of different ways a surgical airway can be trained to accurately prepare for TCCC or other deployment scenarios. Sometimes we are expected to train junior medics despite not having cric experience, or perhaps the ones we did on patients weren’t optimal. Knowing there are different ways, and when to use them is better than “just do it the same way every time because that is how I was taught, or how I got lucky with mine.” This will cover training tips, common mistakes some Instructors encounter, and where this fits in with supraglottic airways, intubation and more. By the end we hope more of us are on the same page and prepared to avoid training scars in order to improve success.
To set the stage, below is a video from Ragged Edge Solutions showing an awake cric by a medic on an enthusiastic roleplayer with realistic moulage, who is being restrained by a teammate.
WARNING: Graphic medical video below of FAKE blood:
Keep in mind that the videos above by Ragged Edge are running a culminating validation exercise for advanced medics. The stressful training above given to a novice medic will be too much, too soon, and also not the only way to go about airway management in TCCC and PFC. Do not try to replicate the above videos on junior medics who are struggling to perform crics in low stress, they aren’t ready yet. We will discuss considerations for the feasibility of this in training. One way shouldn’t be our only tool, so we will discuss where clinicians can consider this in the toolbox. Not every cric is going to be purely awake, not every cric is going to get IV access and sedation. Let us discuss the guidelines and nuance of what we can do.
Index:
Section 1 – TCCC & JTS CPG
Section 2 – CRIC PACE Plan
Section 3 – Implementing into training
Section 4 – Trends to look for when grading students
Section 5 – Why take the airway?
Section 6 – Why not intubate?
Section 7 – Why not SGA / I-gel?
Section 8 – Why not just wait for them to pass out?
Section 9 – Real TCCC Cric Video & Resources
Section 1 – What do the TCCC guidelines and CPGs say?
Before we can begin diving deeper, everyone should be intimately aware of guidelines as a minimum scaffolding so we can expand upon them. You have to master the rules before you can break them. If you’re already intimately familiar with TCCC and JTS guidelines, skip to section 2.
CoTCCC Guidelines from the Deployed Medicine App, October 2024: (click here to view them directly from Deployed Medicine, a resource every military member should be familiar with)
Care Under Fire:
“7. Airway management is generally best deferred until the Tactical Field Care phase.”
Tactical Field Care:
a. Assess for unobstructed airway.
b. If there is a traumatic airway obstruction or impending traumatic obstruction, prepare for possible direct airway intervention.
c. Allow a conscious casualty to assume any position that best protects the airway, to include sitting up and/or leaning forward.
d. Place unconscious casualty in the recovery position, head tilted back; chin away from chest.
e. Use suction if available and appropriate.
f. If the previous measures are unsuccessful, and the casualty’s airway obstruction (e.g. facial fractures, direct airway injury, blood, deformation or burns) is unmanageable, perform a surgical cricothyroidotomy using one of the following:
- Bougie-aided open surgical technique using a flanged and cuffed airway cannula of less than 10 mm outer diameter, 6-7 mm internal diameter, and 5-8 cm of intratracheal length.
- Standard open surgical technique using a flanged and cuffed airway cannula of less than 10mm outer diameter, 6-7 mm internal diameter, and 5-8 cm of intra-tracheal length.
- Verify placement with continuous EtCO2 capnography.
- Use lidocaine if the casualty is conscious.
g. Frequently reassess SpO2, EtCO2, and airway patency as airway status may change over time.
h. Cervical spine stabilization is not necessary for casualties who have sustained only penetrating trauma.
Tactical Evacuation Care:
“Endotracheal intubation may be considered in lieu of cricothyroidotomy if trained.”
(Reminder: Trained does not mean current. If you learned how to do something 6-12 months ago but haven’t touched it since, then you are not up to date. If you want to be good at an intervention, you should try to do it monthly. Would you consider someone a sniper if they only shot once a year?)
To get more advanced, here are excerpts from the the Prolonged Field Care Airway Management Guidelines, which are on the JTS Website, another resource every medic must have saved:
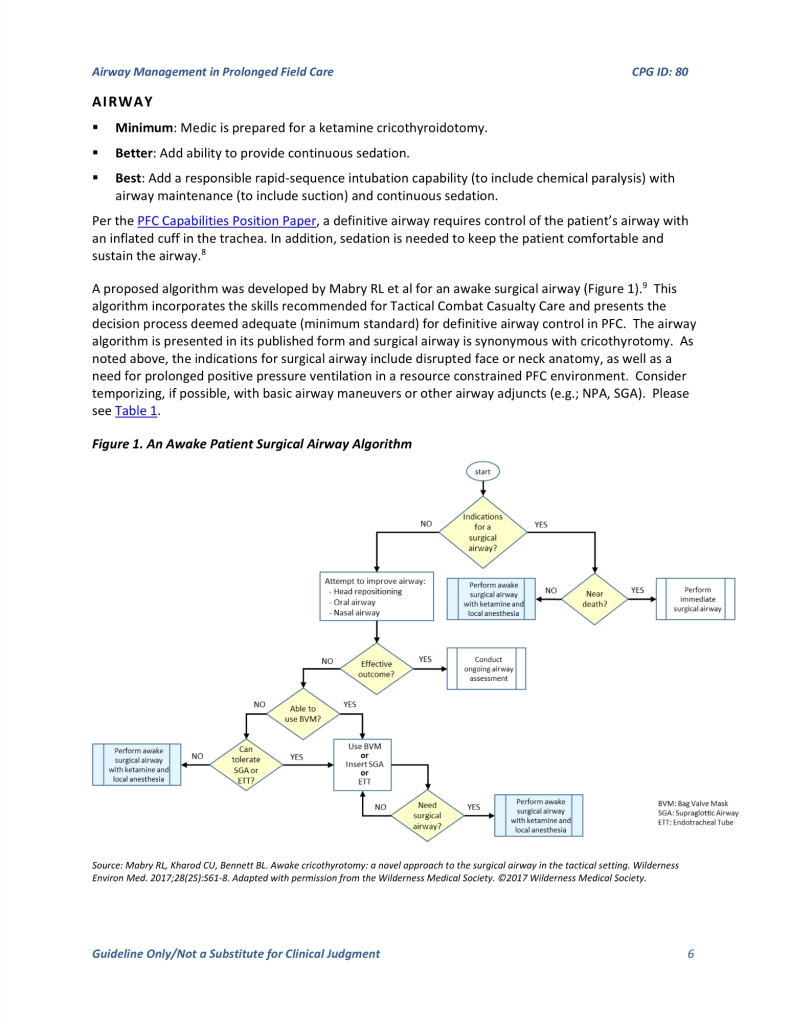
2 – CRIC PACE Plan
Now that you’ve reviewed TCCC and PFC guidelines, we can hopefully begin on the same groundwork on understanding the nuance.
With that in mind, those who teach medics should keep a tiered approach to training crics, and progression in trauma lanes. Why? According to An analysis of battlefield cricothyrotomy in Iraq and Afghanistan, “Physicians and physician assistants were more successful performing Pre-hospital cric than medics with a 15% versus a 33% failure rate.” While this study has a small patient number, it could suggest that medics need to train on this harder to get better. This is so we can be prepared for the scenario where our patient is critical and oxygen starved. Perhaps we don’t have enough time, lidocaine or other Ketamine left, or we are making the decision to ration those limited resources during a MASCAL in extremely austere situations.
Given the above constraints and patient presentations, you could kind of separate your cric into different levels, like a “PACE” plan. This is one way to think about levels to the procedure in order to orient you to the JTS PFC Algorithm above, especially the right hand side, on “near death” or not.
1.) Primary: My patient needs an airway soon, but not emergent. I have time to provide sedation (Ketamine), lidocaine and prepare my equipment and suction (MSMAID) thoroughly. IV/IO Access if needed and able to do it quickly. Non-awake cricothyroidotomy, or one where you have time to plan, such as CASEVAC / PFC.
2.) Alternative: “Vocal and Local”: I have time for at least lidocaine, to talk them through what is about to happen, plus or minus IV (not sedation) for pain and to help if patient crashes. Urgent, but not Emergent.
Check out this video which mentions transtracheal block at 6:25, until we can make one more TCCC specific. (Don’t get distracted by other blocks 3:00-5:00 in, although good anatomy orientation shown.)
3.) Contingency: I do not have the time or resources to do what my patient needs who is actively crashing and can only do Lidocaine at most if I can draw it up fast enough. (Plus or minus restraint and patient communication.)
4.) Emergency: I have made the clinical decision to do a cric without Ketamine or Lidocaine. Using restraint and/or my ability to verbally calm patient while being calm and proficient enough to do it in a timely manner to not cause further agitation. Due to the severity of patient plus or minus logistics and tactical scenario, I must do this now. This must be a reality in training on an awake patient, not necessarily resisting, but not every patient may have time to give medication. This doesn’t mean every awake patient in training needs a full restraint, but it is at least an opportunity for a medic to be confident while talking to their patient, a skill that can be glazed over by a stressful medic used to a manikin not talking or needing to be spoken to.
That frames the JTS PFC CPG in an alternate viewpoint that might be easier for new TCCC instructors to view and prepare their medics for multiple ways to approach the same intervention. The other consideration besides how to cric is that we also need to know when to cric, and when NOT to cric. This means training medics that sometimes sitting patients up is a basic maneuver that can prevent an airway from being forced prematurely, or buy us time to prepare for a cricothyroidotomy. More on sitting up in the next section.
Section 3 – Implementing into training: We know how a cric might go down, how do we prepare our medics?
First, in a calm air conditioned room, we should teach fundamentals to a strict level. We can also introduce them to giving lidocaine to numb the area, which sounds simple but can take awhile to be smooth for an emergency. Drawing up an appropriate dose of ketamine (saline training vial) if Combat Medic (Tier 3), or Consider sedation if Tier 4 (Combat Paramedic/SOCM) is also a surprisingly perishable skill, where even if the medic verbalizes a proper dose, they may draw up a different dose. Pay close attention every time the medication box opens in training to adjust simulated patients reaction and give AAR feedback accordingly.
To follow the BLS repositioning statement, we should also have airway scenarios where a basic repositioning is all the patient needs, or at least buys time for a tactical movement, equipment prep or treating other life threats/patients. Not every scenario we develop should be solved by a cric, especially not an unwarranted one. “If they are already sitting up, do we have to lay them down to cric?” Some military providers have performed cricothyroidotomy with provider sitting up, so it is possible if they are awake, especially if you numb the membrane with lidocaine to make it easier. However, to include this in your toolbox you would have to practice a cric while patient is sitting up. Planning to do something live on an actual patient for the first time without doing it in training probably isn’t as great as someone who is trained on both positions for muscle memory.
Once medics can consistently perform crics with excellent technique as an individual intervention in a calm room, and then as part of a TCCC lane, extra stress can be added. This could be in the form of a patient resisting and needing medication and a competent talk-through by a calm medic, or other external factors such as platoon sergeant telling the medic they have two minutes before they need to move. A shaky, nervous medic won’t instill confidence in a scared patient staring at a scalpel, much less even handing out an Ibuprofen; We have to know what we are doing. This can be especially true, as mentioned above, when manikins, role-players and other mediums are not talking during training, leading medic to have to practice and expect that they will always do this on a quiet, still patient that doesn’t care if we talk to them or not. So a proper brief of a roleplayer by an instructor, like the Ragged Edge video above, really helps the medic understand and get more out of training. Even a knowledgeable instructor using a still manikin or other model can tell a prepared medic student the following: “local national / partner force patient seems resistant to staying still and letting you near. They get apprehensive when they see your scalpel.” That is a verbal cue for a manikin to get them to think through an issue. We will discuss more issues to account for next.
Section 4 – The biggest trends we see that Instructors need to look out for:
- Not comfortable with a Scalpel – Weak Cuts, Initial vertical incision too shallow, secondary horizontal incision too narrow: When teaching, you need to specifically look for scalpel management. The initial incision may be too shallow from not putting enough pressure on end of scalpel with their fingertip, which leads to many shallow slow cuts instead of a couple deep cut(s) to expose landmarks. This shows the medic is not confident with procedure and/or scalpel. I do not think this is purely their fault however because most cric trainers use just a thin piece of tape as a cover for a massive hole, so all it takes is weak scalpel pressure to uncover. However, when the medic finally gets on skin such as cadavers or real patients, then it’s cut, cut, cut, cut, palpate, cut, palpate, cut for 3-4+ minutes. Weak cuts and lack of confidence in anatomy means they aren’t deep enough when they start shoving the tube in, which leads to an issue seen in post-mortem CT scans: cric tubes can be shoved subcutaneous into false passages and even the esophagus. Even if they do find the membrane after a few minutes, they may also be shaky and unaware where their scalpel tips are at times. We want to solve this in training and not let this happen on soldiers and that means instructors are vigilant the second the scalpel comes out.
- Solution: Higher fidelity cric repetitions are a must; get access to higher quality moulage, trainers, cadavers and other mediums when able to. Do not just use single layer thin tape covers on basic cric trainers. I know tape and coban is cheap, but it’s too easy to cut through one layer by itself. Consider more layers of coban on top of a spread out 2×2 gauze that is pulled taut underneath; this way they actually have to do a strong initial incision and additional horizontal incision to get through the gauze.Test it out yourself and find what works for your cric trainer (Shown below.)
- Free Training through Marker Drills:. If we can’t make our low cost cric trainers more accurate, then we cannot be upset when they can’t perform on cadavers or other high fidelity models. Incorporate marker drills by themselves, or before doing a cric on a manikin, you hand the marker to a medic and ask them to draw you where cut goes on a real neck. This is also an opportunity to show “skin shift” so they understand. When you demonstrate marker drills in class, pull the skin to the side first, “draw” the initial vertical incision and or horizontal, then let go to simulate letting go of supporting hand. The incision will no longer be lined up with proper landmarks, which demonstrates to them that tissue moves and why cric landmarks can be “lost” and thoracic wounds may seal themselves off. Marker drills are a free way to verify they know where crics, thoracostomy and I.O.’s go. You may be surprised at the locations chosen.
- Be more strict on low quality trainers (like vent tubing or manikins) as they are very forgiving and way easier to perform the procedure on compared to high fidelity models.
- Conversely, students can also go heavy handed and cause more damage or transected tracheas, so be cautious in pushing students towards being too aggressive, as well.
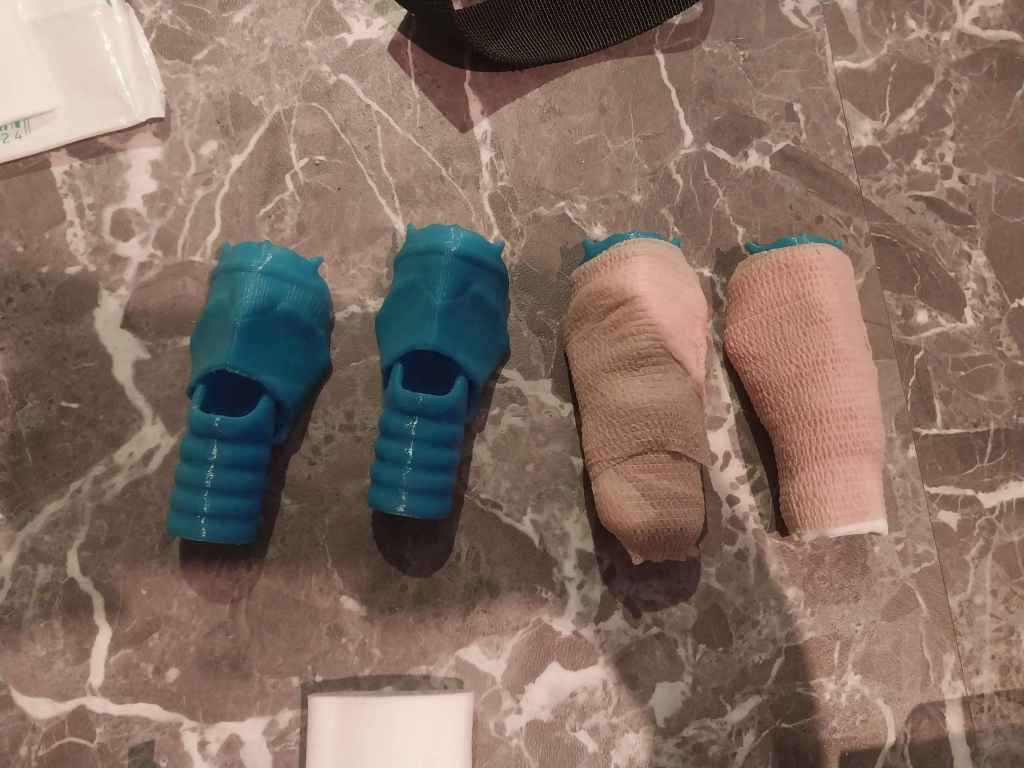
Notice how gauze under coban means you cant make a cut and easily see down into membrane without finger palpation and horizontal cut. Be cautious using too many layers. Ensure it’s taped taut so scalpel can cut through.
Here is a video example of the above process by “Inside Combat Medic” on Instagram.


- The Laryngeal Handshake… and letting go
- Also called “gorilla grip” in some units. Once the non-dominant hand goes above the cric membrane and to the sides, it should stay there until the ET tube is passed so that it can secure it during inflation and to feel bulb inflate. You will commonly see this mistake paired with the prior one we mentioned. Preventing this mistake helps a medic rebound in the event they need to make additional incisions since tube did not fit because they won’t lose landmarks, which saves time as a patient is asphyxiating. The laryngeal handshake acts as a left and right limit to keep landmarks consistent. With all the planes of tissue and skin involved, if a novice medic takes their dominant hand off, the tissue may slide around and cover their incision hole, which means those 1-2 minutes it took them to cut now has to be redone while a patient is struggling. So as an instructor, ensure you teach guys that once that hand goes down it stays there, even if they easily get the cric on the manikin without doing so.
- In real life, can you get away with moving non-dominant hand or is it a “death” sentence? Sure, a strong initial incision can lower “need” for grip, but you should practice to set yourself up for success statistically, especially if you are a novice. Make sure guys learn this way so they can hopefully remember that during the stressful procedure.
- Landmark failure:
- All the scalpel depth in the world won’t matter when we don’t identify the correct location. If you’re reading this, slowly touch your chin and slowly start palpating down your neck until you feel the first structure past your tongue. You should feel a hard structure prior to thyroid cartilage. That is your hyoid bone and a great distractor noted in post mortem cases of crics. To avoid this confusion, some recommend palpating from the BOTTOM, at the sternal notch, which is easy to recognize and palpate. The tracheal rings can also be distinct on most humans, allowing confirmation on the way up to cricoid cartilage. This pairs well with the grip to ensure proper landmarks. While some may use the “three finger” technique to find this landmark, we don’t like using certain things that may be inaccurate on different body types and choose to stick with the fundamentals. Here is a one minute video by Scott Weingart on “bottom up” palpation.
- Lack of confidence:
- one thing we observe is medics of all scopes identify the need for a Cric typically pretty early, even saying it out loud several times or prepping their kit, but hesitate or fail to do it until pushed pretty hard by a proctor. They subconsciously know to do it, but taking action and actually taking the airway is another thing, especially with higher fidelity models. It’s one thing to learn to do a procedure, but it can be a different animal on pulling the trigger to do it. Watch out for this, and ensure you are paying attention to stopwatch to give proper feedback on how much time they wasted on hesitation… and to change the patient’s vitals.
- Equipment considerations:
- Some of us get trained on this procedure but nobody may tell us advantages and disadvantages of equipment when packing our own aid bags. Perhaps someone hands us a kit that looks cool, but it may not be. How do we know as new medics?
- Our personal opinion addresses some common thought processes medics may have. You can of course do what you want, but here are some trends you should be aware of. Whatever you choose, it needs to be trained frequently.
- Make your own kit from 6.0 ET, Scalpel, 10 blade, 10mL Syringe and securing device
- Premade Tactical Kits
- Cric-Key. $$$
- The first choice for most is simple and cheapest: Scalpel and ET tube. Why does that matter? Would we not want a fancy kit on the worst day of our lives? Well, unfortunately most military units do not have unlimited funds. The more you spend in one area, the more another may be neglected. Additionally, you don’t just need to buy 1-2 kits for aid bag or battle belt. You need many kits to train with throughout the year. While reusable, the bulb can pop so you still need multiple to train each medic with. That is why scalpel and ET is so easy because they are easy to acquire and get in so many repetitions. You can vacuum seal your own kits pretty easily. If you’re going to consider lidocaine, then a 5mL syringe, 2% lidocaine vial and angiocath will also need to be with or near kit.
- Tactical Kits are great if you can afford enough to outfit and train with. However we have seen anecdotal cases of high fidelity models such as cadavers and others where some kits can cause issues that instructors and medics should be aware of. The biggest is some tactical kits do not have rigid inserts already inserted, so the short ET tube is floppy and blunt… the opposite of a bougie and what you want if you made a weak initial incision. Ensure you double check yours has one, and if not make one and train for it to account for this potential hang up. Some brands even come with bougies preloaded, other medics use vacuum sealers to do it themselves. The only other considerations is you’re not just buying 1-2 kits for personal use for each medic in the unit but enough to get adequate training reps.
- The Cric Key: The data is not clear in it being superior to an ET tube and it’s $300+ per kit… which means you’re spending thousands per medics per year to keep them trained. The bulb is also soft so the trainers may pop easily. If this is an option for a medic, it would have to be in a place with excellent funding so that limited funding isn’t detracting from other supplies.
- ET tube sizes: Sometimes medics grab a 7.0 to 8.0 ET tube for their cric kits they make themselves. We recommend 6.0 for standard military demographic, and consider 5.5 or lower for female or smaller soldiers due to height of cricothyroid membrane and external diameter of tube. Can you make it happen with a larger diameter? Sure it’s not impossible, but during an emergency it is easier to get a smaller tube into a small hole, so we recommend it. While some critical care combat paramedics may choose 8.0 intentionally due to pulmonary toilet concerns, they must weigh the choice of that long term benefit versus initial success. A bougie could be used to switch tubes later on if they are so inclined. For novice medics, ensure they aren’t carrying above 6.0 (Insert cric tube size vs membrane height considerations)
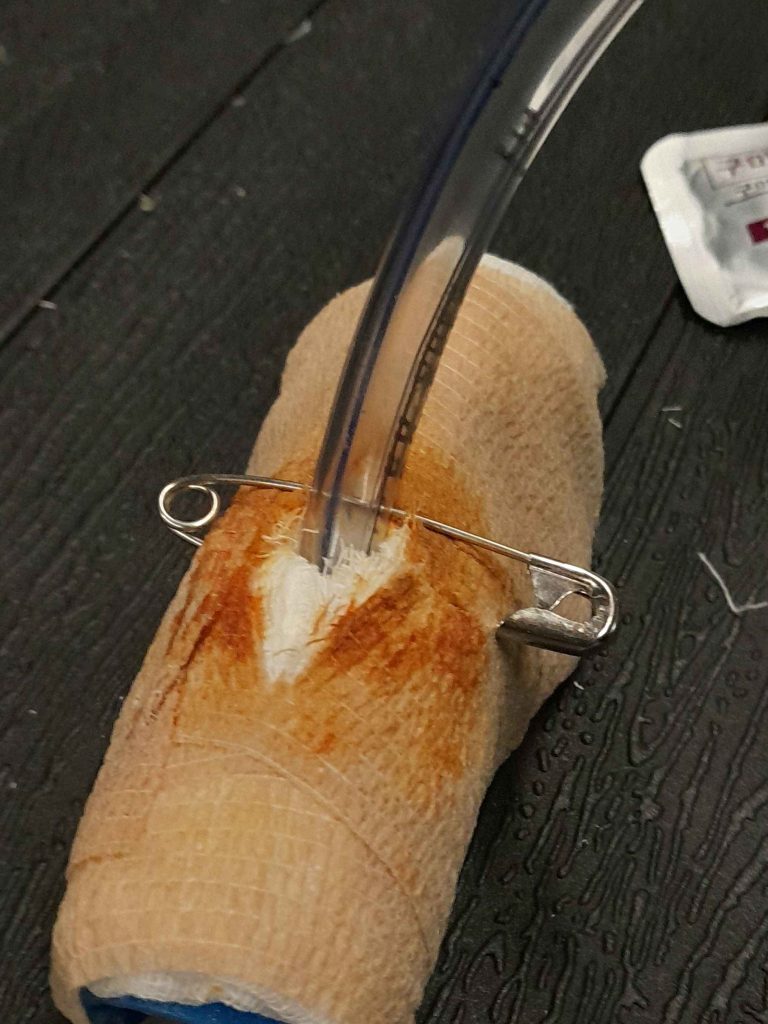
- Securing Device: Medics may argue over which device is best for securing, but no medic argues over the importance of securing the tube. You don’t want all your hard work to go to waste with a tube getting pulled out. If you are grading a medic who performs a cric under duress and “forgets/chooses” not to secure before moving on kr movement then that is a massive AAR point to discuss. The cuff is not enough and neither is a chest seal by itself, which also catches on the bulb. This can easily be accomplished by having pre-cut IV tubing in your cric kit. If using commercial securing devices or tapes, ensure it can work with burns.
- To bougie or not to bougie: This is a contentious point for some. Not everyone is using bougie’s for crics yet because they may not get trained on it, usually because their instructors were not. This is up to us to break the cycle, If you notice our first trend of weak initial cuts, this is a ripe solution to address it because even the weakest horizontal cut can allow a bougie to maintain your landmark, even if you need to make an additional cut. If you’re still adamant about not using one for initial placement, still consider worth of bougie in the kit for tube exchange if something goes wrong such as blocked tube, popped bulb/cuff or other concerns. If you are an instructor who isn’t super comfortable, we recommend you step out of your comfort zone to get good at it and at least teach your students to use it, even if you do not. If you are absolutely against bougie, we recommend at least a stylet in your vacuum sealed kit, to maintain rigidity and help you pass the tube.
Here is an example of how to perform with a bougie while avoiding some of these issues shown above:
Section 5 – “Why take the airway or cric, anyway?”

The JTS Prolonged Field Care CPG excerpt above answers just some of the many indications as simply as a complex question could be answered. There are lots of indications, which is why it is wise to eventually add training scenarios for medics beyond just “severe burns or maxillofacial injury”, only AFTER they are great at those. Those two indications become an easy button for algorithm based medicine, but don’t account for insidious airway worsening, needing an airway for ventilation purposes more than airway itself, or other disease non-battle injury (DNBI) cases that require a clinicians mindset on consideration for taking an airway. This article could be pages longer on indications to take an airway alone.
Section 6 – “ Why not just intubate, instead of cric?”
TCCC guidelines state at certain parts, if trained. We want to add “If trained AND current” to your thought process to be picky about word choice. Just because you did some intubations 2-3 years ago does not mean you are able to consider it in your toolbox. Also, the TCCC considerations of maxillofacial trauma or severe burns can create a “Cant Intubate, Cant Ventilate” (CICV), a term you should be aware of, which is the reason Combat Medics emphasize cricothyroidotomy anyway. Third, logistics and skills may mean that even if you had the skills to intubate… you may run out of, or use so much medication to get them down and keep them down that you may have to convert the endotracheal intubation to a cricothyroidotomy later anyway. To placate the point further, let’s say you have the skills and the equipment in a perfect world… paralyzing a patient and sedating during a tactical scenario is a liability and also means an additional person needs to be on BVM and not able to function in other roles. Intubation with just sedation and no paralytics has a higher risk and lower success rates if you’re considering that route. Remember, TCCC is not ALL medicine, just tactical, so it can still be a DNBI consideration for a Role 1+. Statistically in TCCC patients will either not need an airway at all, need a cric to live, or could be expectant or already deceased. If you still don’t agree or want more information, listen to two amazing Army Doctors discuss this on the PFC Podcast.
(Check out this episode of PFC podcast if you want an in-depth discussion on Intubation versus Crics for PFC
Prolonged Field Care “What is the best airway?” Discussion with Evan Baines and Doug Powell)
Section 7 – “ So no intubation, what about Supraglottics (SGA) such as the iGEL? TCCC took them out of guidelines so that means a medic will never use them?”
Supraglottics were taken out of the recent TCCC guidelines, but they are still in a 68W Combat Medics scope of practice. How do we reconcile these two things? Well the first word of TCCC is Tactical, not “all Military medicine.” There are uses for SGA’s, just not likely in TCCC. If you remember our statistics above that military medics have a significant failure rate with crics depending on the source, then you can appreciate the fact we need more training. Many medics say they do not get enough training though, so if we only have a little time and cant be great at everything, it makes sense to master the cric FIRST, instead of just getting average at it and then moving on to training on SGA’s. If cric mastery has been attained, and only then, it would seem more feasible to consider it part of the toolbox for rare considerations. However, much like our intubation discussion above, the amount of medication it takes to prepare a patient to accept one AND keep them down to receive one is a large logistical burden. A patient can tolerate a cric for hours with little to no meds, on the other hand. An SGA may also not work well in the case of a swollen burned airway or severe maxillofacial trauma, which is our biggest win in TCCC. So train on what would save the most lives first, and add the not-as-common occurrences after.
Section 8 – “Why not just wait until they pass out to perform the cric? Nicer than cutting them while awake.”
Alright, I’m not trying to overwhelm you but I am going to take the chart below and put it into digestible terms.

It’s called the “Oxygen Hemoglobin Disassociation Curve”, and to summarize, if you go too far down that steep curve, it gets worse and it is harder to go back up. Look at how drastic the line changes. Once a patient has gone far down the curve (such as a cric patient asphyxiating for a long time) getting them back up isn’t as easy as it was to go down. It is like the difference in effort of walking downhill versus running uphill in mud. So we don’t want to put ourselves behind the curve in a patient who is struggling, if we can get ahead. This option shouldn’t happen if we can help it, unless patient is resistant and you make the clinical or operational decision not to physically or chemically restrain, do not have medication to spare otherwise, or are forced to because tactical situation does not allow you time to take the airway anyways.
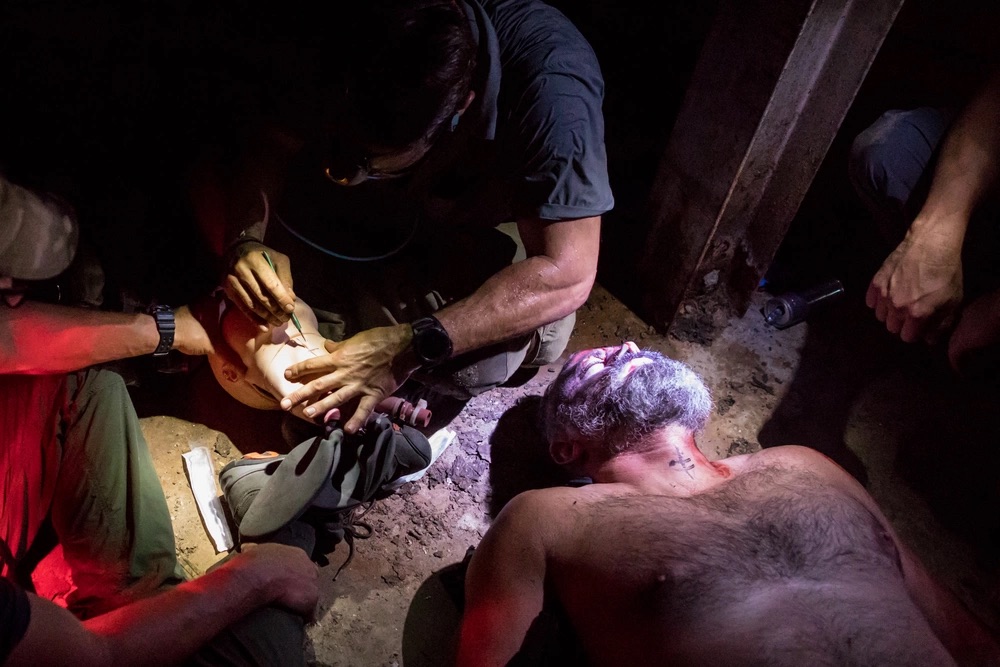
Section 9 – Real TCCC Cric: This is what you are training to do. (Turn your sound on and watch the clock)
Great video by an experienced SOF Medic. We can all hope our crics in TCCC patients can go over this well and quickly. The standard for crics on some gradesheets is four minutes… how long was this one? Rewatch it to see and make sure volume is on.
Great familiarization with kit, great landmark recognition and scalpel management. If you notice, the medic does remove laryngeal handshake as we talk about above, but his strong initial cuts mean he is successful. If you want the full breakdown on this 42 person MASCAL shown above by this medic himself listen to PFC podcast episode 110.
As we discussed earlier, account for this with your students and junior medics through grading strict form in training on lower fidelity models because they likely wont have as much training exposure or confidence with the scalpel.
It’s up to you to train your students to a high standard, and have them practice their skills on their own even if your unit doesn’t train often, to be able to perform that well and mitigate stress. Again, Would someone who considers themselves a sniper shoot once a year? Then how could we cric a low fidelity manikin neck once a year and call ourselves cric “snipers?” We can’t. Practice monthly if possible, and push to work on more high fidelity models when able.
Thanks for reading, feel free to comment and add to the discussion below or on Instagram. We can easily edit the article or add it to the bottom here if you let us know.

If this guide wasn’t enough to satiate your pallet, here are further resources to nerd out with:
