

This is Part 3 of a 5 part series on fundamental concepts in ventilator management. See Part 2 is here.
The goal of good ventilator management is to deliver appropriately sized breaths at appropriate rates and at appropriate times. This section will cover how to select the right breath settings, as well as how to titrate them based on patient response. This section builds on the previous section, and it may be helpful to have it open for reference.
The Vt of a healthy adult at rest is surprisingly small: around 500 mL for a 6 ft tall adult male. For comparison, a pediatric BVM holds around 700 mL of air. It is important to note that only the height and gender of the adult in the example are listed; the patient’s weight is not mentioned. This is because a patient’s lung volume is determined by height and sex. As an example, consider Kobe Bryant and Danny Devito: Kobe Bryant weighs 96kg and Danny DeVito weighs 88kg. If tidal volume calculations were based on weight, the two of them would receive breaths of approximately the same size. Instead, tidal volume is based on something known as “Ideal Body Weight”, which is determined only by the height and gender of the patient.
For men, the ideal body weight equation is:

And for women:

Although it is important to be familiar with these equations, standard practice is to use apps or charts which is much quicker and avoids math errors.
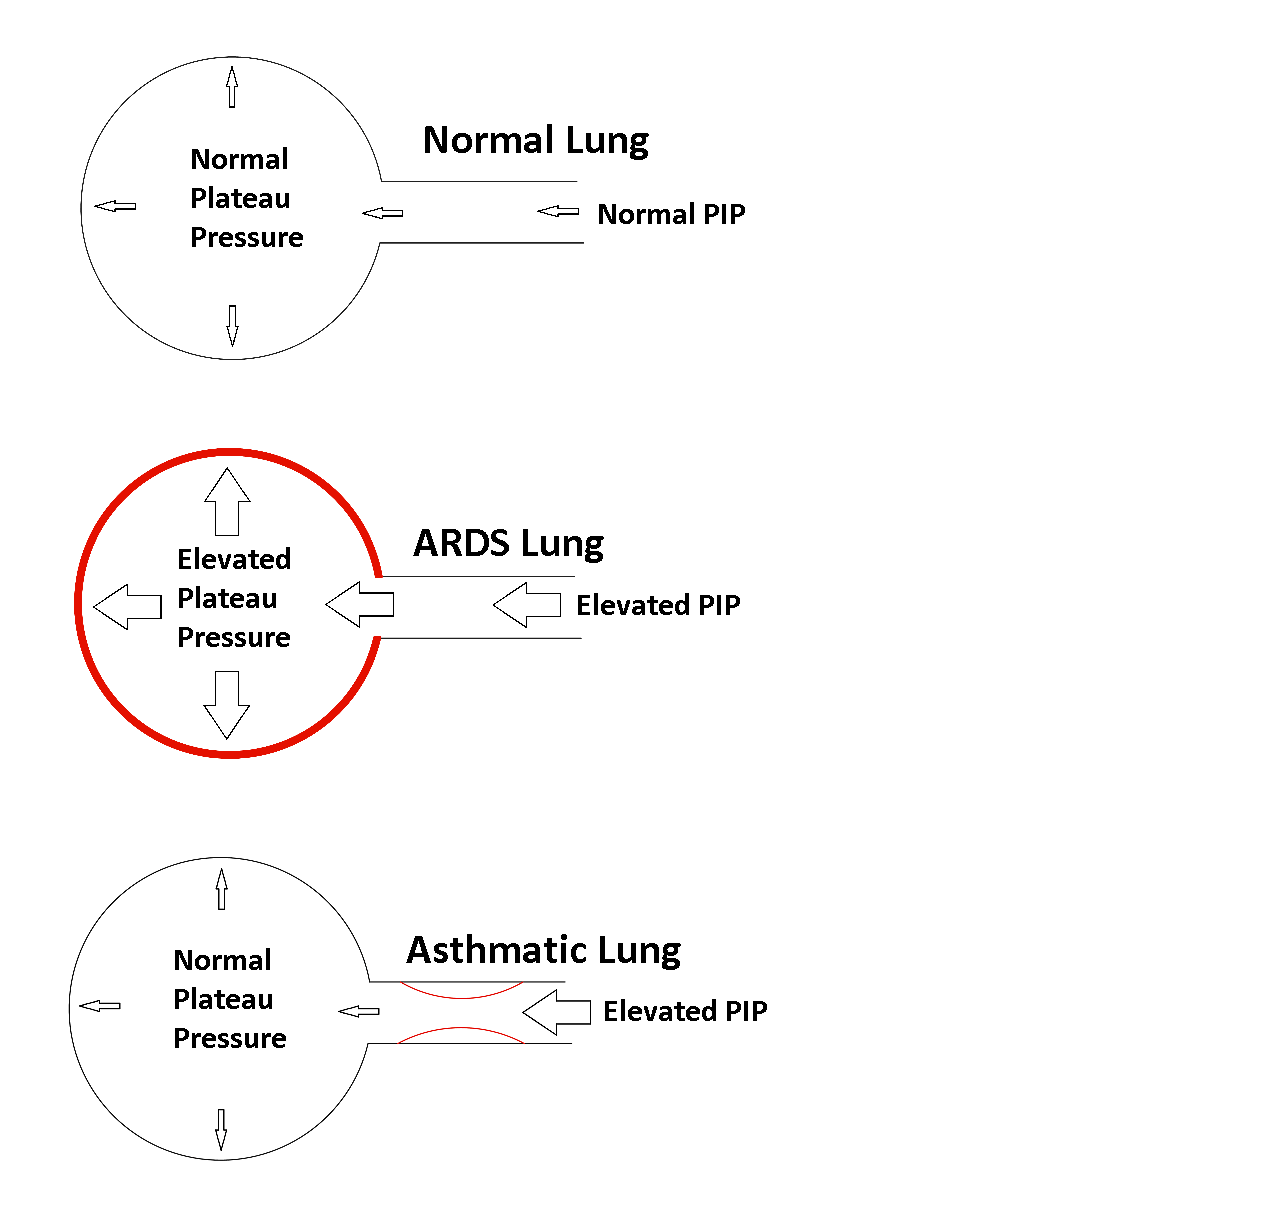
Once the IBW has been calculated, the next step is to choose a “dose” of inhaled gas. Current standard practice is to use 6-8 mL/kgIBW. The risk of ventilator induced lung injury rises with the “dose” of inhaled gas, so it is best to start at 6mL/ kgIBW and adjust from there. In patients with preexisting lung injury, it may be appropriate to reduce the Vt as low as 4 mL/kgIBW. Correct Vt is important because excessively high Vt causes “Ventilator Induced Lung Injury.” Excessive Vt (> 8 mL/kgIBW) over-stretches and damages the alveoli, leading to development of Acute Respiratory Distress Syndrome (ARDS). This is a major cause of death and disability for ventilated patients, therefore it is very important to keep Vt from rising above the normal range.
As an example, the 6 ft tall man described earlier has an IBW of 77.6 kg. His initial Vt should therefore be set between 466-621 mL, aiming at the lower end of that range. If the patient is in a volume control mode, the desired Vt would be directly programmed into the vent. Using a pressure control mode is slightly more complex, since the patient’s lung compliance is unknown. In order to use a pressure control mode, set the vent to a conservative PIP of 15 cmH2O and adjust up or down depending on the Vt produced.
The next setting that should be considered is the PEEP. In the previous section we assumed that lung compliance was constant. While this is a good approximation when considering a single breath, it is not accurate when compliance is looked at over multiple breaths. If you’ve ever blown up a balloon, notice that it takes a lot of pressure to initially get it to stretch open, but once it’s partially inflated, it’s relatively easy to inflate further. This holds true for alveoli as well, it is easier to inflate partially inflated alveoli, than completely collapsed alveoli. PEEP maintains residual pressure in the alveoli, so that they are much easier to inflate on the next breath. To demonstrate this, conduct the following experiment using a test lung and a vent:
- Put the vent in Assist-Control Pressure mode, with a PIP of 20 cmH2O and a PEEP of 0 (or the lowest PEEP the ventilator will allow). Write down the Vt.
- Raise the PEEP in increments of 2-3 cmH2O while keeping the PIP at 20. Observe the Vt as you raise the PEEP.
- Continue raising the PEEP until the Vt decreases.
This experiment shows that Vt does not initially decrease even though we are lowering ΔP by 2-3 cmH2O each time we raise the PEEP. As we raise the PEEP, the reduction in ΔP is being compensated by a rise in compliance. There is a limit to this effect, which is most apparent when you consider a PEEP of 20 and a PIP of 20. No air would move regardless of improved compliance, because ΔP is 0. Compliance will also eventually fall as you raise PEEP, because the lung will eventually retain so much air that it becomes difficult to push any additional air in during delivery of a breath. A good starting point is to set the PEEP at 5 and adjust from there. Patients with stiff alveoli (such as ARDS) will require higher PEEP settings, and patients with restrictive airway disease may require lower PEEP settings.
The next setting to consider is the I-time or the I:E ratio. Aim for an I:E ratio of at least 1:1.5. For example: If a patient is breathing 20 times a minute, they have 3 seconds available for each breath. If the I-time is set to one second, the patient will have 2 seconds of E-time, for an I:E ratio of 1:2. It is generally safe to start at an I-time of 1 second for patients with a normal respiratory rate, since the I:E ratio wouldn’t drop below 1:1.5 until they reach a respiratory rate of 24.
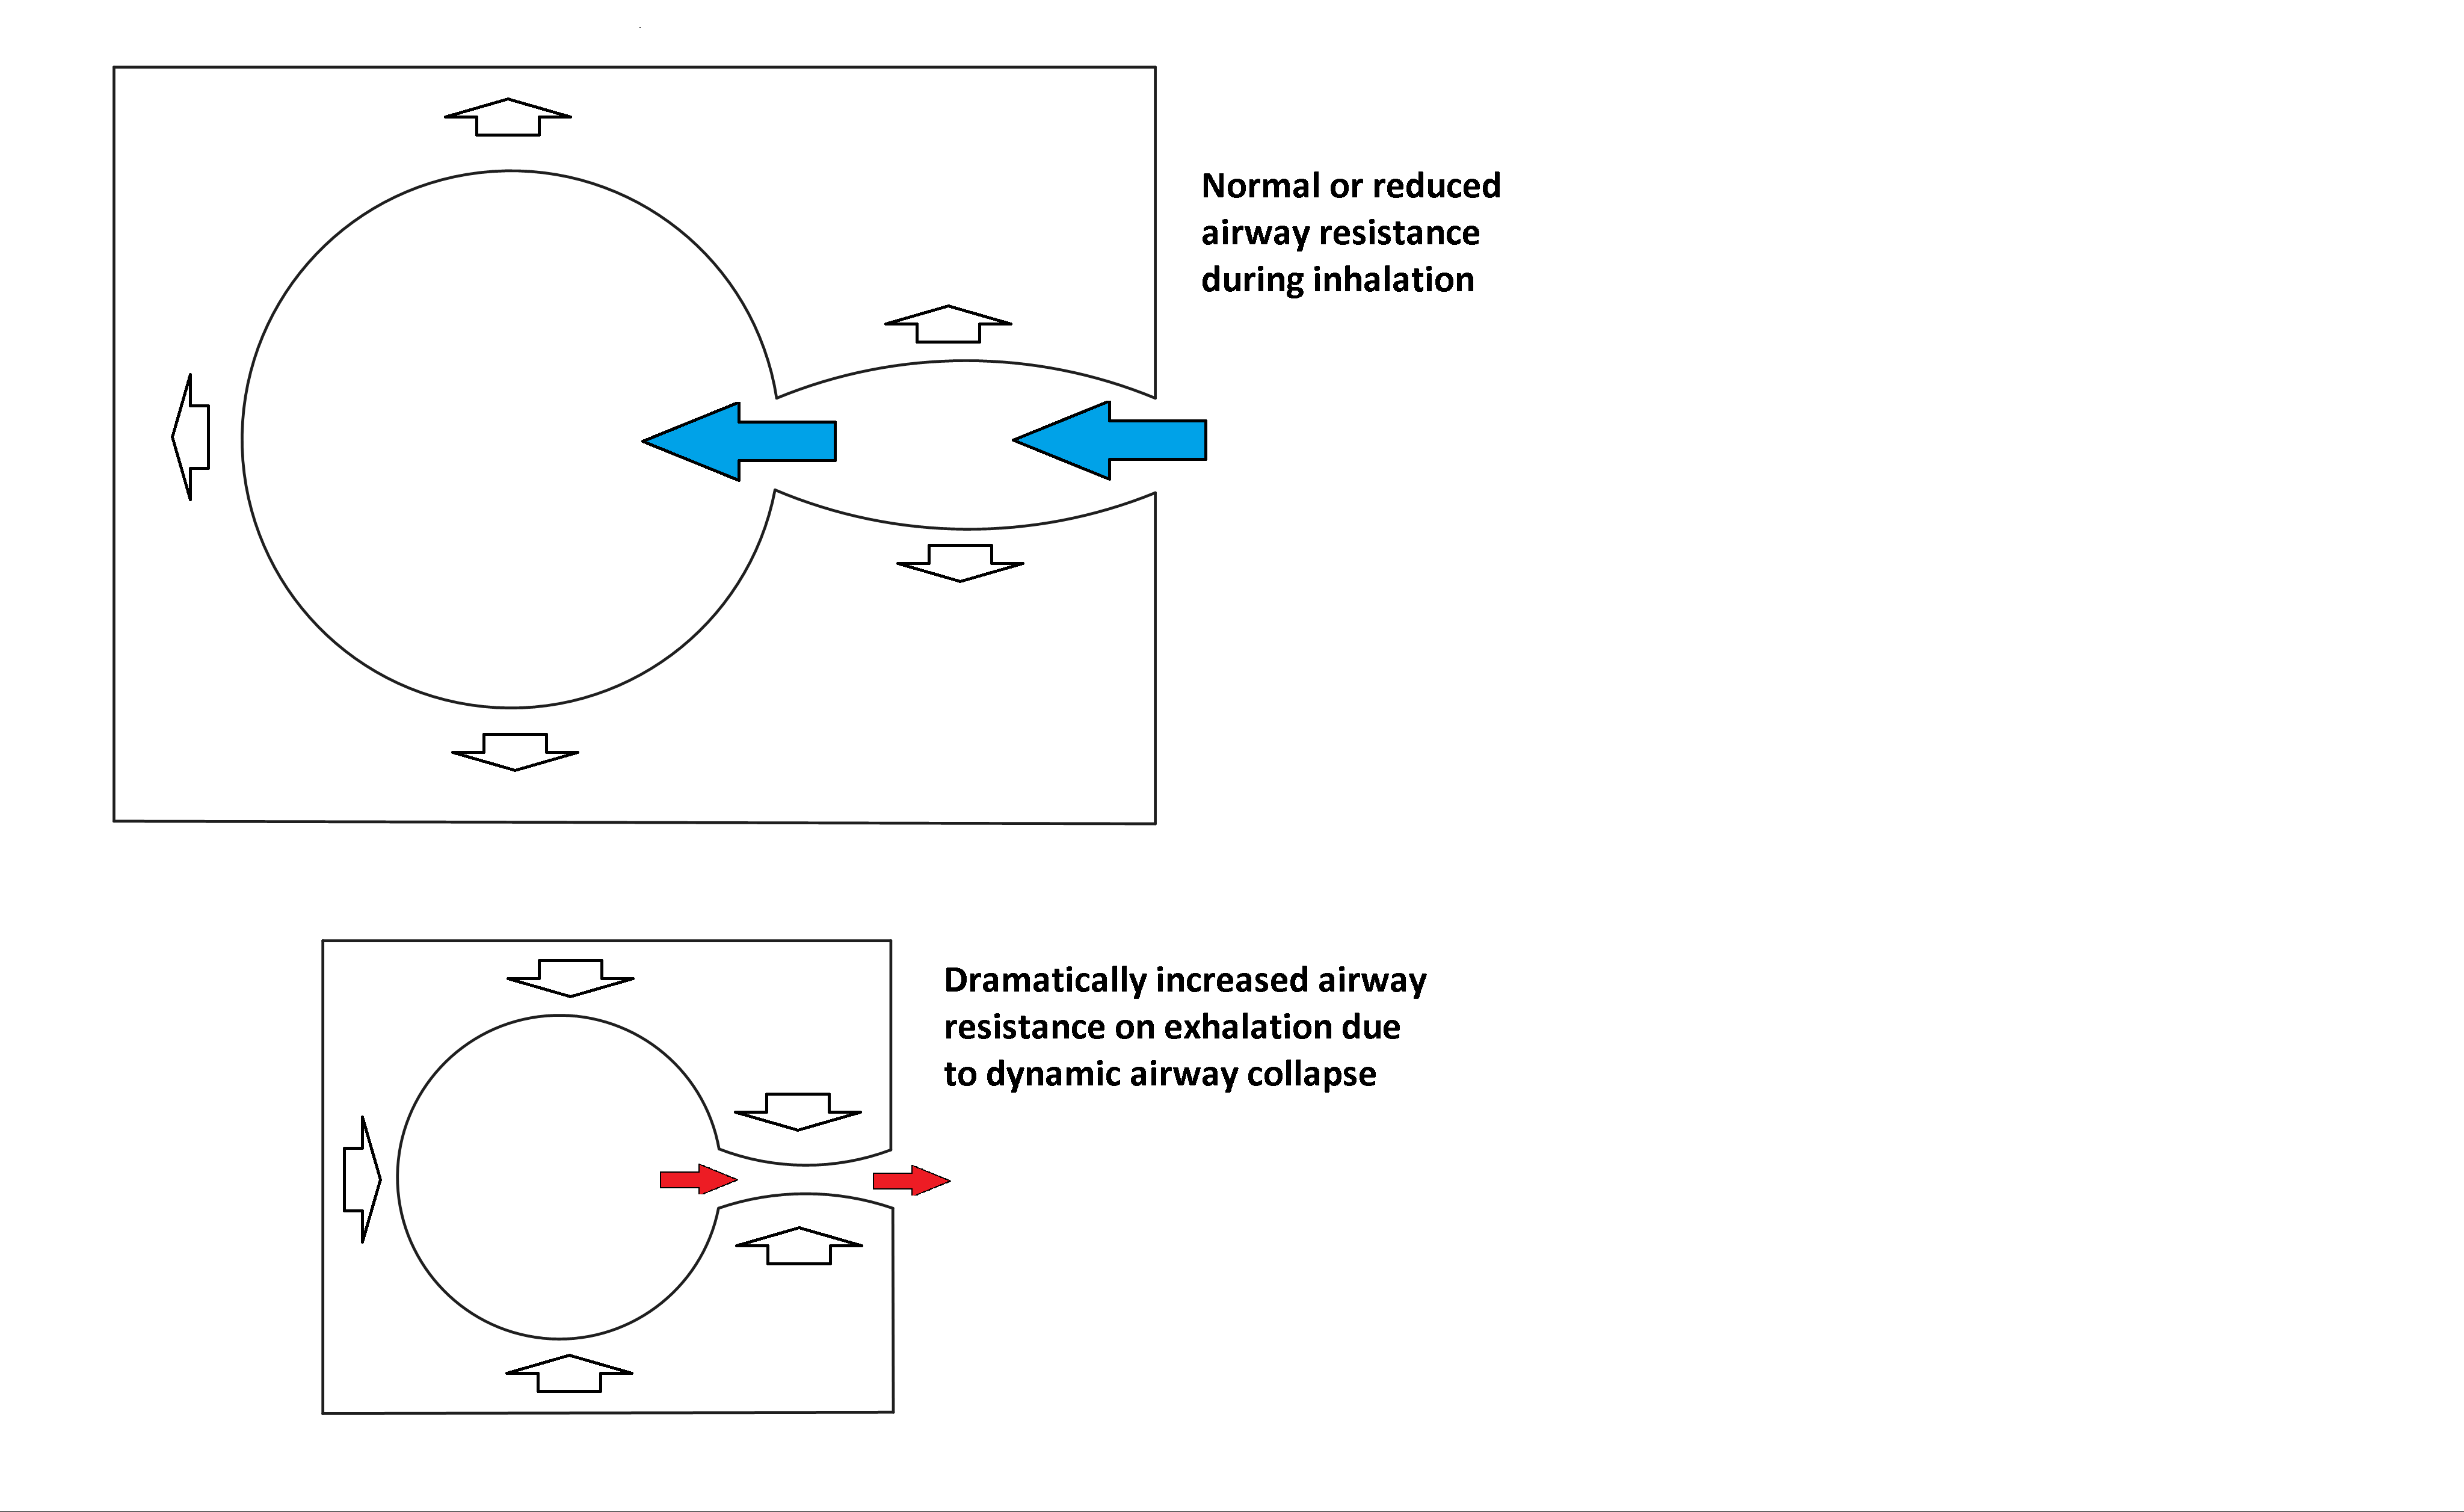
A notable exception to the standard I-time setting is for patients with restrictive airway disease. Per the resistance equations, inspiratory flow is determined by the difference between PIP and Palv. Expiratory flow, on the other hand, is determined by the difference between Palv and PEEP. In a patient with good alveolar compliance (Cstat) and very high resistance (RAW), the PIP has to rise to overcome the inspiratory flow resistance to deliver an adequate Vt. Since Vt and alveolar compliance are normal, Palv will remain unchanged from normal physiology (refer to the Cstat equation). Elevated RAW with a normal Palv to PEEP difference leads to a large reduction in expiratory flow. This leads to a condition known as “breath stacking,” where the next breath is delivered before the previous breath has been fully exhaled. This causes a progressive rise in intrathoracic pressure that can be severe enough to mimic (or cause) a tension pneumothorax. The solution is to shorten the I-time and keep the respiratory rate on the low end of normal to allow the maximum amount of time for exhalation. PIP can be raised to compensate for the shorter I-time if needed.
Note that another way to increase expiratory flow is to reduce the PEEP. This is an excellent strategy for asthmatics who have increased RAW due to constricted airways. COPD patients, on the other hand, often have high RAW because their airways are collapsing during expiration. PEEP can splint these collapsed airways open, thereby reducing RAW. Severe COPD is a challenging disease to manage, since these patients often have both restricted and collapsed airways. It becomes very difficult to get their ventilation back to normal. Do not compromise either lung protection or oxygenation to achieve good ventilation. These patients are often managed using “permissive hypercapnia,” which is a strategy that allows the etCO2 to rise, since any further optimization of ventilation would come at the expense of worsened oxygenation or lung protection.
The next setting to consider is respiratory rate. This is a bit of an unusual setting, since what gets programmed into the vent may not be the rate the patient receives. Since most ventilator modes allow the patient to trigger breaths, the set rate is actually just the minimum respiratory rate the vent will allow. Respiratory rate (in broad terms) should be titrated to maintain normal etCO2 and adequate minute volume. These two are closely related: if the etCO2 is normal, then the minute ventilation generally well matched to the patient’s metabolic demands. Normal minute volume is usually between 6 and 10 liters per minute, but this is variable depending on the patient’s exact physiology. This topic is discussed in greater detail in “Vent Modes.”
The final setting of concern is FiO2. It is usually safe to start with an FiO2 of 100% during the initial setup of the vent. This protects the patient from hypoxia while optimal parameters are set. Once the ventilation settings have been programmed, decrease the FiO2 to 60% and observe the SpO2 for several minutes. An FiO2 above 60% will eventually result in lung injury from the high levels of oxygen, so the goal is to get a satisfactory SpO2 at an FiO2 under 60% if possible. The most straightforward way to titrate the FiO2 once you get to 60% is to target an SpO2 of 92-96%. Remember that changes in FiO2 can take several minutes to show in the SpO2, so titrate down gradually once you get to 60%.
At this point, the vent should be ventilating the patient well, with minimal risk of damage to their lungs. In the next section, we’ll discuss how to get the vent to deliver breaths at the appropriate times.

Leave a comment