
This article was last reviewed in December 2018 and is based on research available at that time. We will attempt to update this page as new evidence and best practice becomes available.
“Colloids and Crystalloids don’t carry oxygen or clotting factors. As Combat Medics we stop hemorrhaging, so it only makes sense to replace the blood lost with blood, not clear fluid. Whole Blood is the superior fluid for the hemorrhagic shock casualty and the first choice for TCCC Fluid Resuscitation. This page is intended to be a resource for medics learning all about blood, as it can be a vast, intimidating topic at first. While the transfusion itself is relatively simple to perform (Just a blood type and cross-match, an I.V. stick and spiking a bag), there is a rare chance of transfusion reactions, even if you have the correct ABO blood type. This means the next generation combat medic needs to not be afraid of using blood, just as he is not afraid of using his scalpel for a cric, but instead be educated and understand the risks, how to recognize, troubleshoot and treat them. “
If you have flash player, this is the “Blood Typing Game” you can play to learn blood types. It has you type the patient, then perform blood transfusions and you choose which blood to give. This is a fun intro to brush up on and apply it. Designed by Nobelprize.org
—> Click here to play the Blood Typing Game at Nobelprize.org <—
Here’s a quick intro on blood, it’s importance (hemostasis, oxygen) and types:
Crash Course Anatomy & Physiology: Blood
Fresh whole blood training presentation.
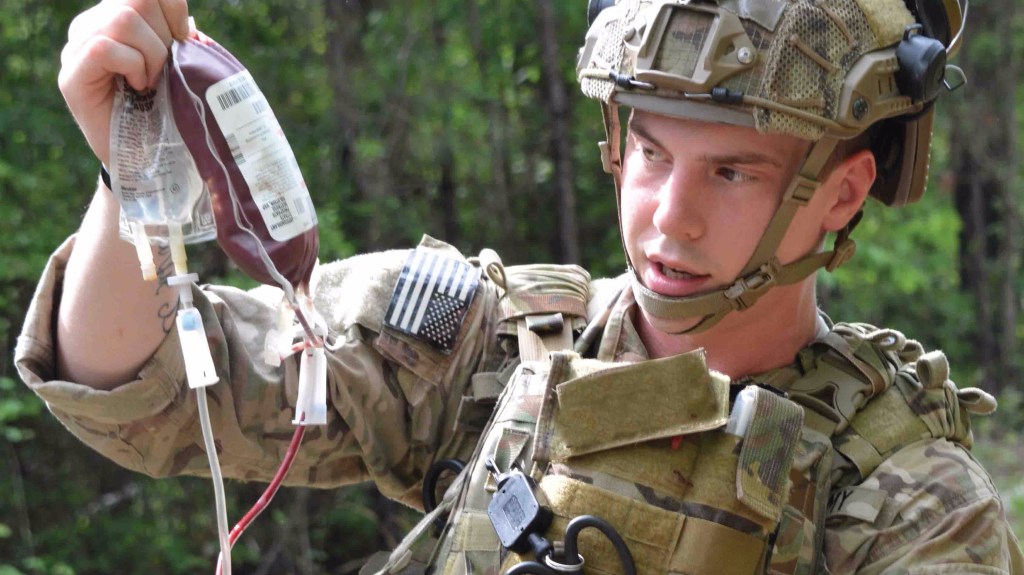
“Walking Blood Bank”:
For further discussion, see US Army Institute of Surgical Research Clinical Practice Guidelines: Whole Blood Transfusion
1. Donor recruitment:
Donor selection can be very broad and deserves some explanation. There are two broad categories, prescreened and unknown population. Each of these can be further divided by preference:
Order of Preference (for Prescreened):
1) Prescreened low titer O blood
2) A-A, low titre O for everyone else
3) Matched blood
4) High titer O
Order of Preference (for Unknown Population):
1) Group specific matched
2) Group O for any patient
Unknown Donors:
In a situation where a population unknown are in consideration for fresh whole blood transfusions without transfusion transmitted diseases (TTDs), it creates a much higher risk for disease and transfusion reaction. Identifying the best candidates should be the first step in the process.
In the following article, Doughty et al. propose a questionnaire for identifying donors.


The risk triage bases the scoring system on:
- Past blood donation history
- Ease and safety of venipuncture
- Lifestyle
- Travel history
- Veins and body weight
- Occupation/role
Once the optimal donor has been identified, the blood group must be verified.
Eldon Cards are on of the field expedient ways to test blood, Here is a video showing it being done. There is no voice over, so trying to find a better video. As you can see, it’s not rocket science but a good hands on class to have medics perform. Afterward, you can have them quietly walk around the room and write down what they think the other Eldon cards say so they can get exposure to multiple types.
You did your Eldon Card and this is what it looks like…
Would you give this blood to an O neg patient?
Are you sure?

First you have to know how to read them, then how to apply it.
Here’s a visual guide:
 Memorizing that can be difficult, and most blood typing kits come with a “cheat sheet” to double check your work. It’s still good to know how the card works to understand which each section means.
Titers, Simplified… “What is low titer?”
– Titers are a measure of the amount of antibodies the donor has in there blood for another blood group. See the figure below, group A blood has anti-B, the amount someone has can be measured. This is important with low titer group O whole blood. Group O has both anti-A and anti-B, however, those levels can vary greatly. There is also concern for IgM vs IgG, which are the two immunoglobulins (Ig) responsible for reactions. IgM is a pentameric Ig and the immediate response to an antigen. After an exposure, IgG is the produced, IgG is the most abundant Ig in serum. In some countries, they measure both IgG and IgM to determine low titer. In the DoD, IgM is the only Ig measured, the same applies to the FDA. However, in forward settings and for the FWB donor program, the limit for IgM anti-A and anti-B is <256. Whereas, the FDA requires IgM anti-A and anti-B is <150.

As technology improves, it will enable the development of more reliable, easier to interpret ABO testing kits.
Performing Field Blood Transfusion:
Blood and blood products should only be administered by personnel who are trained in the proper procedure and the identification and management of transfusion reactions.
Use only collection bags designed for the collection of Whole Blood and administration sets designed for the administration of blood and blood components. Failure to do so may lead to fatal thromboembolic events.
Blood may be administered without fluid via a single in-line filter. If fluids are administered with blood, 0.9% normal saline or Plasmalyte is the IV fluid of choice for administration with blood products. Colloids (Hextend), lactated Ringer’s or dextrose-based fluids should NOT be used at any time.
FWB Draw and Transfusion
- Medic identifies need for blood transfusion
- Presence of hemorrhagic shock
- Hypotension (Blood Pressure <80 mmHg systolic)
- One or more major amputations
- Penetrating or blunt torso trauma
- Suspected pelvic fracture
- Evidence of severe bleeding
- Altered mental status
- Presence of hemorrhagic shock
- Obtain IV/IO access in casualty
- Administer TXA
- Call for blood with blood type or have roster to identify your donor
- Required equipment need
- Eldon cards-if unknown ABO of donor and/or casualty
- Indelible markers
- Chlorhexidine swabs
- 16 gauge catheters
- Needle ports and needless ports
- Constricting bands or Penrose drains
- Blood collection bags
- Clamps
- 2x2s and 4x4s
- 18 gauge catheters
- Y-tubing
- 9% normal saline, 100 ml
- Required equipment need
- Collect one unit and confirm with senior medic
- Confirm-Patient and blood type
- Confirm-Donor and Blood type
- Time
- Amount
- Administer
Face-to-face communication is always preferred and will have to happen prior to administration. The “universal donor” will be identified by a roster and will be carried by all personnel that may collect a unit and medics. All “universal donors” will carry at least one 450 ml single blood-pack unit with CPD or CPDA-1 with them; in addition the personnel that can collect a unit will carry multiple 450 ml single blood-pack unit with CPD or CPDA-1. Blood collection will begin immediately following proper identification of the donor-full name and battle roster number.
While the donor is sitting in a comfortable position, place the constricting band around the upper arm. Look for a larger vein, most likely that will be in the antecubital fossa. The vein must be large enough for a 16 gauge needle.
When you find a good vein, clean the area with a chlorhexidine swab and let it dry. It is important that sterility is maintained throughout, whole blood has the highest risk of getting infected.
Take the blood collection bag and place it below the heart of the donor, place a clamp 2-3 inches from the needle, then uncap it. At a 45-degree angle, insert the needle into the donor’s vein. You will not see a flash of blood like you see when starting an IV. Once you are sure you are in the vein, lower your needle and advance a few millimeters.
Unlock the clamp and watch for blood to start flowing into the line and bag. Place a piece of tape and 2×2 over the site to keep it from coming out of the vein.
While collecting the blood, make sure you rock the bag every few minutes to mix with the anticoagulants in the bag. This helps prevent any clotting. Also, monitor your donor to make sure they are not getting lightheaded or nauseated. If so, treat appropriately. At this time, you can also label the bag with the name of the donor, blood group, you name, and collection time.
You will want to collect 450 mL (±10%) of blood. There are a few different ways to tell if the blood bag is full. The best way is to simply weigh it on a scale, which may be available to you. However, if you are at the point-of-injury, that will be unlikely. Other methods include placing a 6 ½ inch cable tie around the long axis of the blood bag. Another is folding over the top of the bag about 1 inch, just be careful not to puncture the bag. Some bags may have a line at the top to indicate a full bag. Overfilling can be hazardous to the donor and casualty. Be familiar with one of these options.
Once the bag is full, discontinue the donation. The fist step is apply the clamp again near the needle. As with any IV, make sure you have something to cover the site and tape. Withdraw the needle and have the patient hold pressure over the area. Make sure the donor eats and drinks something soon after donation. The donor can return to the fight, but he or she might want to stay out of the direct fight. Hold the donation bag up by the line and unclamp the line allowing the blood in the line to collect in the bag. Once that is done, clamp the line near the bag. Now, tie two overhand knots in the line 1-2 inches apart. Using a pair of shears, cut between the knots. Properly dispose of the line and needle.
In order to transfuse blood, you have to use an administration set with a filter, this will catch any clots that may form during the procedure. Similar to a standard IV line, make sure all the roller clamps are closed. It is not necessary to use normal saline when transfusing, but a small amount can be useful to help flush the line. So first you can spike a 100-ml bag of normal saline and unroll the upper and lower clamps. Once that is complete, close both roller clamps. You will need to keep the upper roller clamp to the normal saline closed. Now, peel back the port on the blood bag and insert the administration set into the blood bag. Once it is fully seated, unroll the upper clamp to the blood bag and squeeze the drip chamber till it is half full of blood. Now, unroll the lower clamp to prep the line and sure there is good flow. Unsure the lower
Attach the luer lock to the IV and loosen the lower roller clamp to start the infusion. You may want to start slowly, which will allow you to observe for any reaction. At this time, you will need to document on the bag, time of infusion and who is infusing the blood.
Ensure you document everyone on the DD Form 1380 and that all used and unused blood products go with the patient to the hospital.
Monitoring
TCCC recommends using radial pulse and mental status as parameters for shock, but there are problems with both. While, the loss of a radial pulse is more likely to relate to shock, the presence of a pulse does not necessarily give an accurate measure of blood pressure. It is been shown that there can be significant differences between radial pulse and blood pressure. Therefore, it is recommended that the following parameters be used to monitor the patient’s progress goals of resuscitation is:
- Heart rate <100 beats per minute
- Blood pressure >100 mmHg
The medic will continue to monitor the parameters and adjust as needed. If there is no significant change in the parameters 10 minutes after initiating the FWB transfusion, the medic will call for more blood and the process will repeat. It is not recommended that a blood transfusion be stopped unless the there is a transfusion reaction that will end in a fatality. In order to not delay evacuation to definitive surgical care, if the donation is not complete, the donor can be evacuated with the casualty and complete the WBT on the evacuation platform.
Even with low risk of transfusion reactions, pre-medication is advised. Prophylactic treatment with 1 gram acetaminophen via IV or rectal is recommended as the severely injured will most likely be unable to take anything by mouth. This is given to help control fevers. In addition, 50 mg diphenhydramine is given IV for any allergic component of the reaction.
Types of Reactions
Acute Hemolytic Reaction
Signs and Symptoms: An acute hemolytic reaction (AHR) is the most serious reaction when administering blood products, it can also be extremely difficult to detect in the trauma patient. This generally occurs due to transfusion of incompatible red cells rather than plasma.
- Typical onset is within 1 hour of administering blood products.
- The most significant sign and consequence of AHR is acute hypotension and shock (or worsening thereof).
- Flushing, especially in the face.
- Shaking, chills (rigor).
- Fever, an increase in core temp of > 2° F (1° C).
- Evidence of disseminated intravascular coagulopathy (DIC) – oozing from the blood draw, IV sites.
- Flushing, especially in the face.
- Flank pain or the acute onset of pain in the chest, abdomen and thighs.
- Wheezing, dyspnea.
- Nausea and Vomiting.
- Hypotension.
- Pain, inflammation, and or warmth at the infusion site.
- Red or brown urine (hemoglobinuria).
Anaphylactic Reaction Occurrence: 1:20,000-50,000.
Signs and Symptoms: Shock, Hypotension, Angioedema, Respiratory Distress. These signs may be extremely difficult to detect in a hemorrhagic shock patient. Onset of symptoms is generally within minutes from time of administration of blood products.
Febrile Non-hemolytic Reaction
Signs and Symptoms: Fever, an increase in core temp of ≤ 2° F (1° C), chills.
Management of Reactions
The first step in all transfusion related issues are to stop the transfusion and save all of the blood products and equipment used for administration and typing for follow up testing.
Acute Hemolytic Reaction: Indication for transfusion was hemorrhagic shock and AHR will cause further injury to your patient. Mainstay of therapy is support of circulation with blood and fluids. After discontinuing incompatible transfusion, support circulation with blood as available(drawn from a different donor) and fluids (NS/Plasmalyte bolus). Ensure airway remains patent. If patient is conscious and complaining of pain, pruritis, fever, give 1-gram acetaminophen (IV, PO, PR) and 50 mg diphenhydramine (IM, IV, PO). Corticosteroids may be helpful in managing acute dyspnea.
Anaphylactic Reaction: Occurs most commonly in IgA deficient patients (very rare). Treatment the same as any other anaphylactic reactions: 0.3 ml Epinephrine 1:1000 IM; airway maintenance and oxygenation; resuscitate hypotension with crystalloid IV fluids; corticosteroids IV, IM.
Febrile Nonhemolytic Reaction: This reaction should be expected and administering tylenol before or during the transfusion is optimal. Give 1-gram acetaminophen PO, PR, IV. If symptoms abate and there is no evidence of an acute hemolytic reaction, consider restarting the transfusion.
Further Data/Resources/Literature:
- Tactical Medical Emergency Protocols AKA “TMEPS” (9th/10th Edition) has a step-by-step guide to whole blood transfusion. Recommended to have a “how to” guide to do in the field to make sure no details are skipped.
- Special Operations Forces Medical handbook, 2nd Edition has a Whole Blood section.

Leave a comment